


As a Business Operations Strategist, you could say that organization and productivity are my love language. I’ve worked with companies of all sizes and I know just how important having streamlined, efficient systems and processes is to the success of your business. I still remember my first time in using ClickUp, one of the digital business tools having a serious moment. It was a little intimidating. Loads of features, endless opportunity for customization, and its all-encompassing approach. ClickUp is the go-to, all-in-one tool to help you run your business well.
With several thousand hours of ClickUp time under my belt, I have a solid grasp of the platform, and how to use it and tailor it to help small businesses… rather than cause confusion and frustration. Setting up a project management system can be a challenge and isn’t an easy feat and honestly, setting up your business in ClickUp is on the next level. Luckily, I’ve got a few tricks up my sleeve and knew it was time to share The Beginner’s Guide to Using ClickUp. Keep reading for my best tips for using ClickUp in your business (in a way that works for you)!
The Basics
Believe me when I tell you that I could probably write a short novel about the many incredible features that ClickUp has to offer but I think it’s important for you to have a solid grasp on the foundation of the platform before getting too complex. With that, let’s cover 3 key ClickUp basics: The Hierarchy, The Views and The Anatomy of a Task.
The Hierarchy
ClickUp’s major claim to fame is its comprehensive hierarchy. Whether you’re looking for a bird’s eye view of everything or needing to hone in on one specific department or project, the ClickUp hierarchy works wonders.
Here’s what you need to know:
-
Every element of your ClickUp falls within your organization’s Workspace
-
Workspaces contain Spaces
-
Spaces contain Folders, Lists (and more recently Docs, Forms and Whiteboards)
-
Folders can be used to organize Lists, Docs, Forms and Whiteboards
-
Lists, Docs, Forms and Whiteboards are all types of Views in Spaces that can also be added to the navigation menu
-
Lists contain Tasks
-
Tasks can also be viewed using other Views such as Board, Calendar, Gantt Chart and Table
-
Tasks contain Subtasks and Checklists (as well as many other elements)
**See Exhibit A for a visual
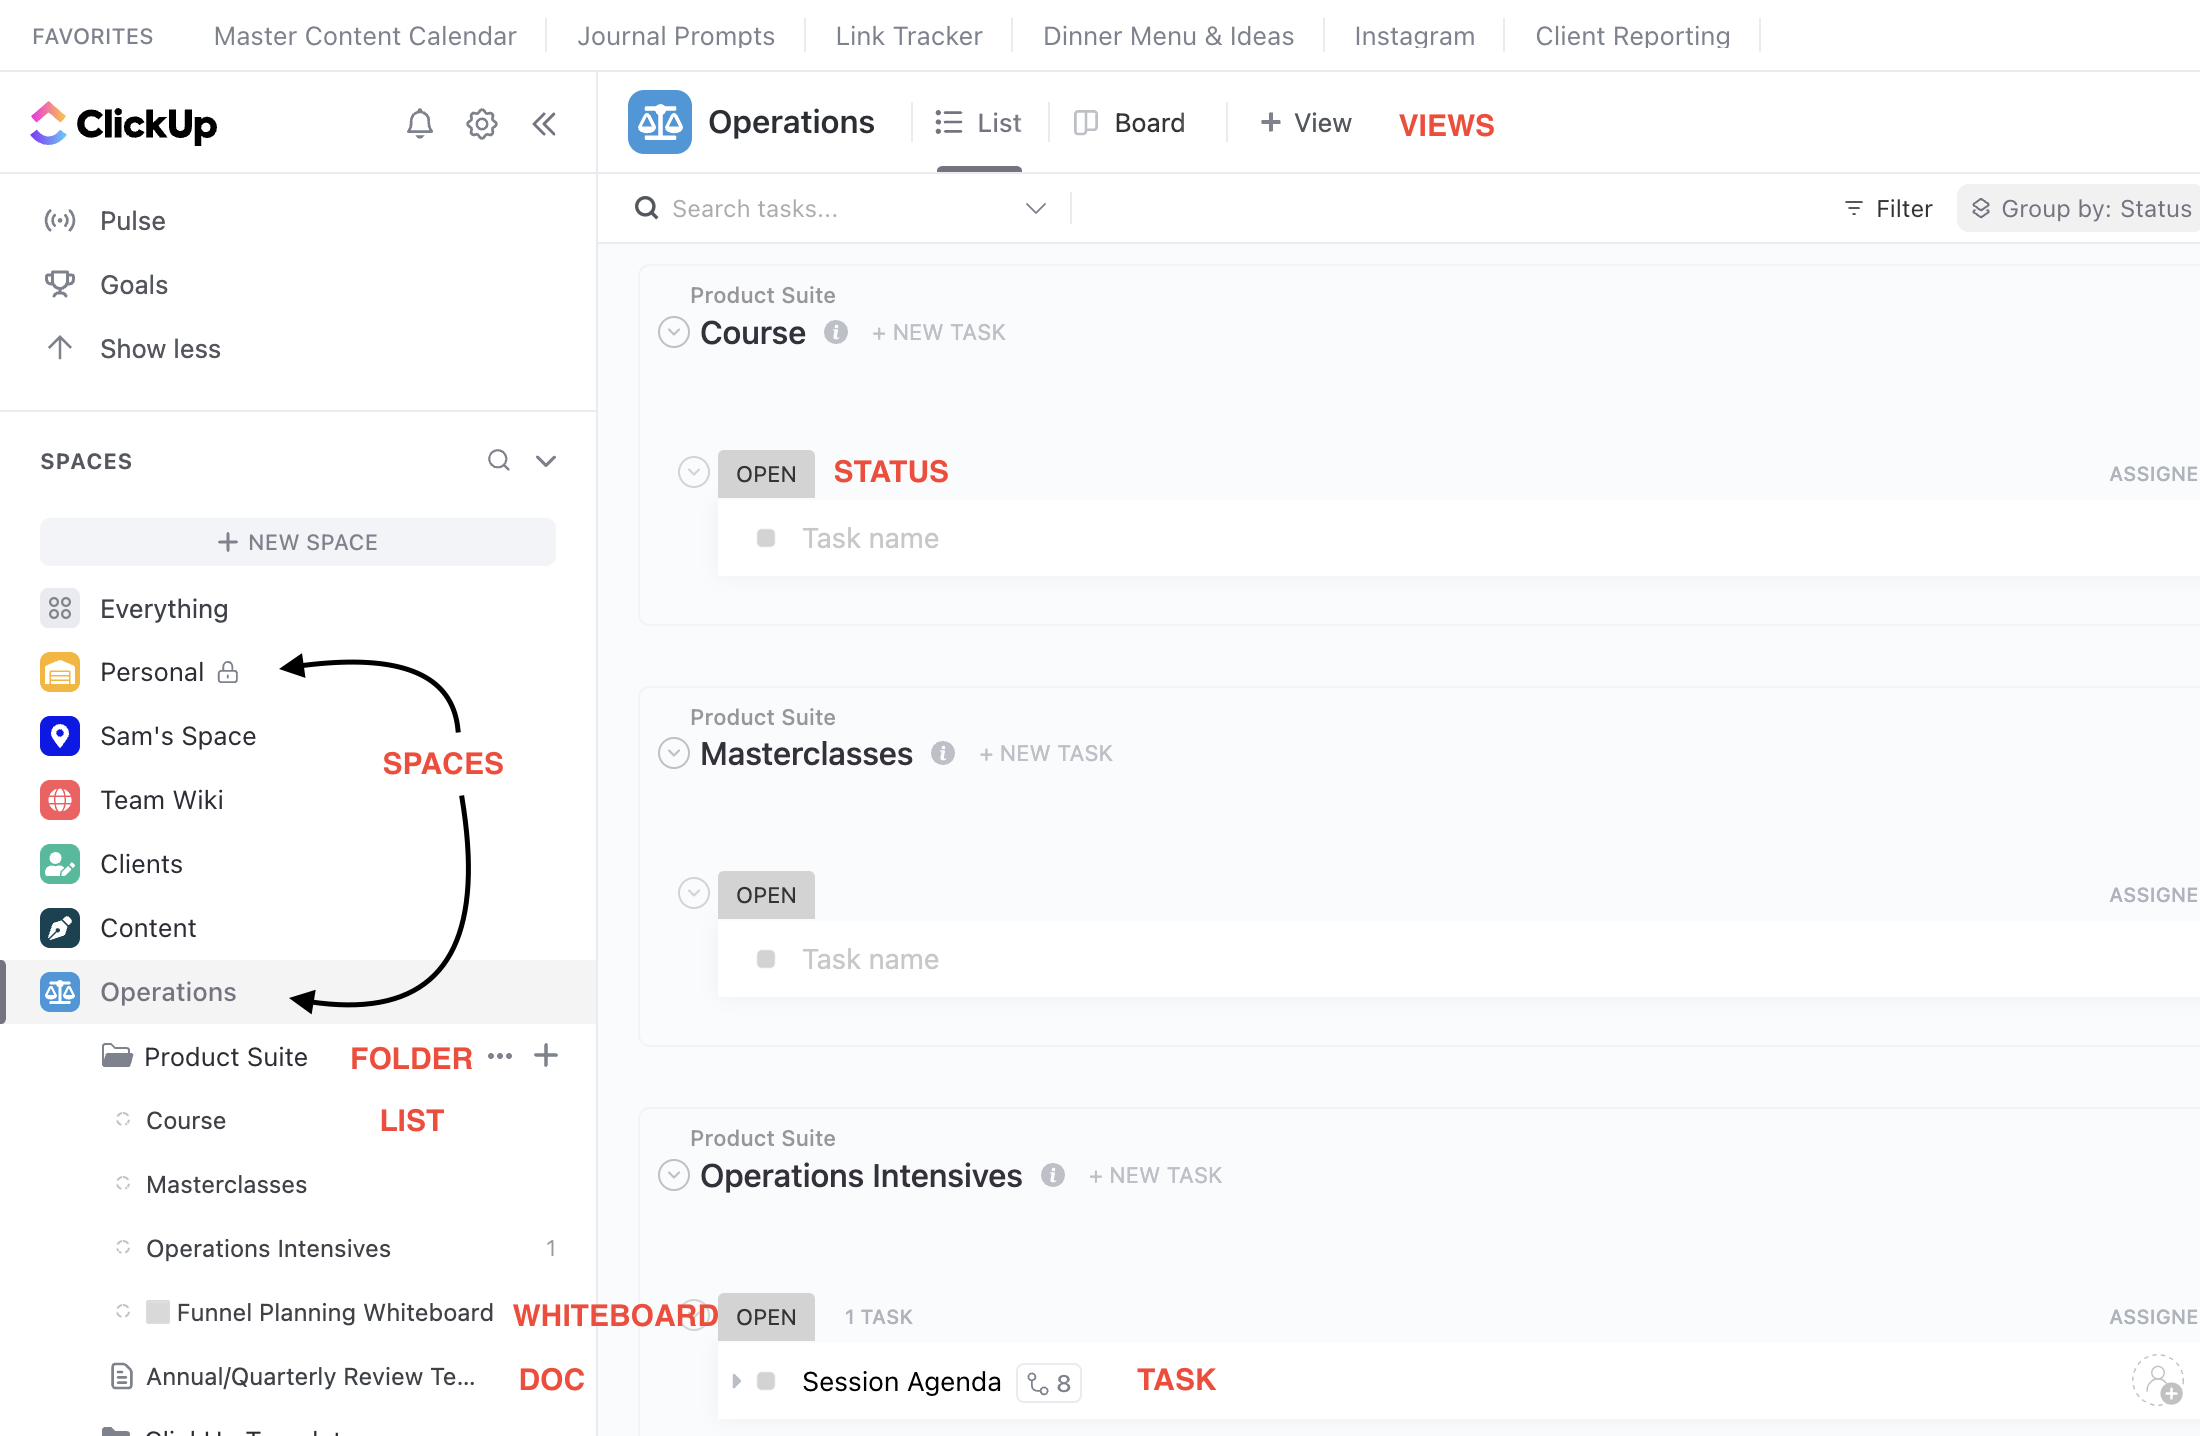
EXHIBIT A
My Expert Tip:
With the ClickUp hierarchy, it’s easy to create loads of Spaces, Folders and Lists but my recommendation is to keep the Spaces area lean and use Views and Custom Fields (more on these down below) to keep your Workspace organized and ensure that you and your team can easily find exactly what you’re looking for when you need it.
In practice, this might look like using a Custom Field to indicate which phase of a project a specific task belongs to (which you can use to filter data in a single list) rather than having a separate list for every phase of the project. This gives you the ability to view an entire project from end to end and accurately determine your progress on one single screen.
The Views
ClickUp is incredibly customizable and can be set up in a way that suits how you work best. Use any combination of the 15 available Views to get into a productive groove and see tasks and data that make sense. Most Views also allow for additional customization including filtering by Status, Custom Field or Due Date (to name a few).
The Most Notable ClickUp Views:
-
List – The default view, Lists are your go-to checklist for all Tasks.
-
Board – KanBan style cards that can show loads of data (including images) at a single glance.
-
Calendar – Tasks are slotted into the calendar based on the dates selected. The calendar view is great for creating content calendars or mapping out a launch plan.
-
Gantt Chart – Perhaps my personal favourite… the Gantt Chart generates a comprehensive schedule for your project and can also indicate dependencies between tasks as well as Critical Path to help you get things done on time and on budget.
-
Embed – Link to external assets such as Airtable databases or Google Docs or Sheets to create a full picture in one easy-to-navigate space.
-
Forms – Use Forms to collect information to automatically create new tasks, this would be ideal to use to keep a pulse on client questions or feature requests.
-
Docs – ClickUp’s solution for Google Docs… create, edit and share docs with your team (and people outside of ClickUp), link to tasks and more.
-
Chat – Similar to Microsoft Teams or Slack, you can use Chat for instant messaging with your team members or contracts as well as your clients.
-
Table – create relational databases that can link to Tasks, Docs and more and utilize Custom Fields for easy data manipulation.
-
Whiteboard – ClickUp’s newest view, Whiteboards, allows you to create workflows, mindmaps and more. It’s ideal for brainstorming and collaboration when planning your big ideas.
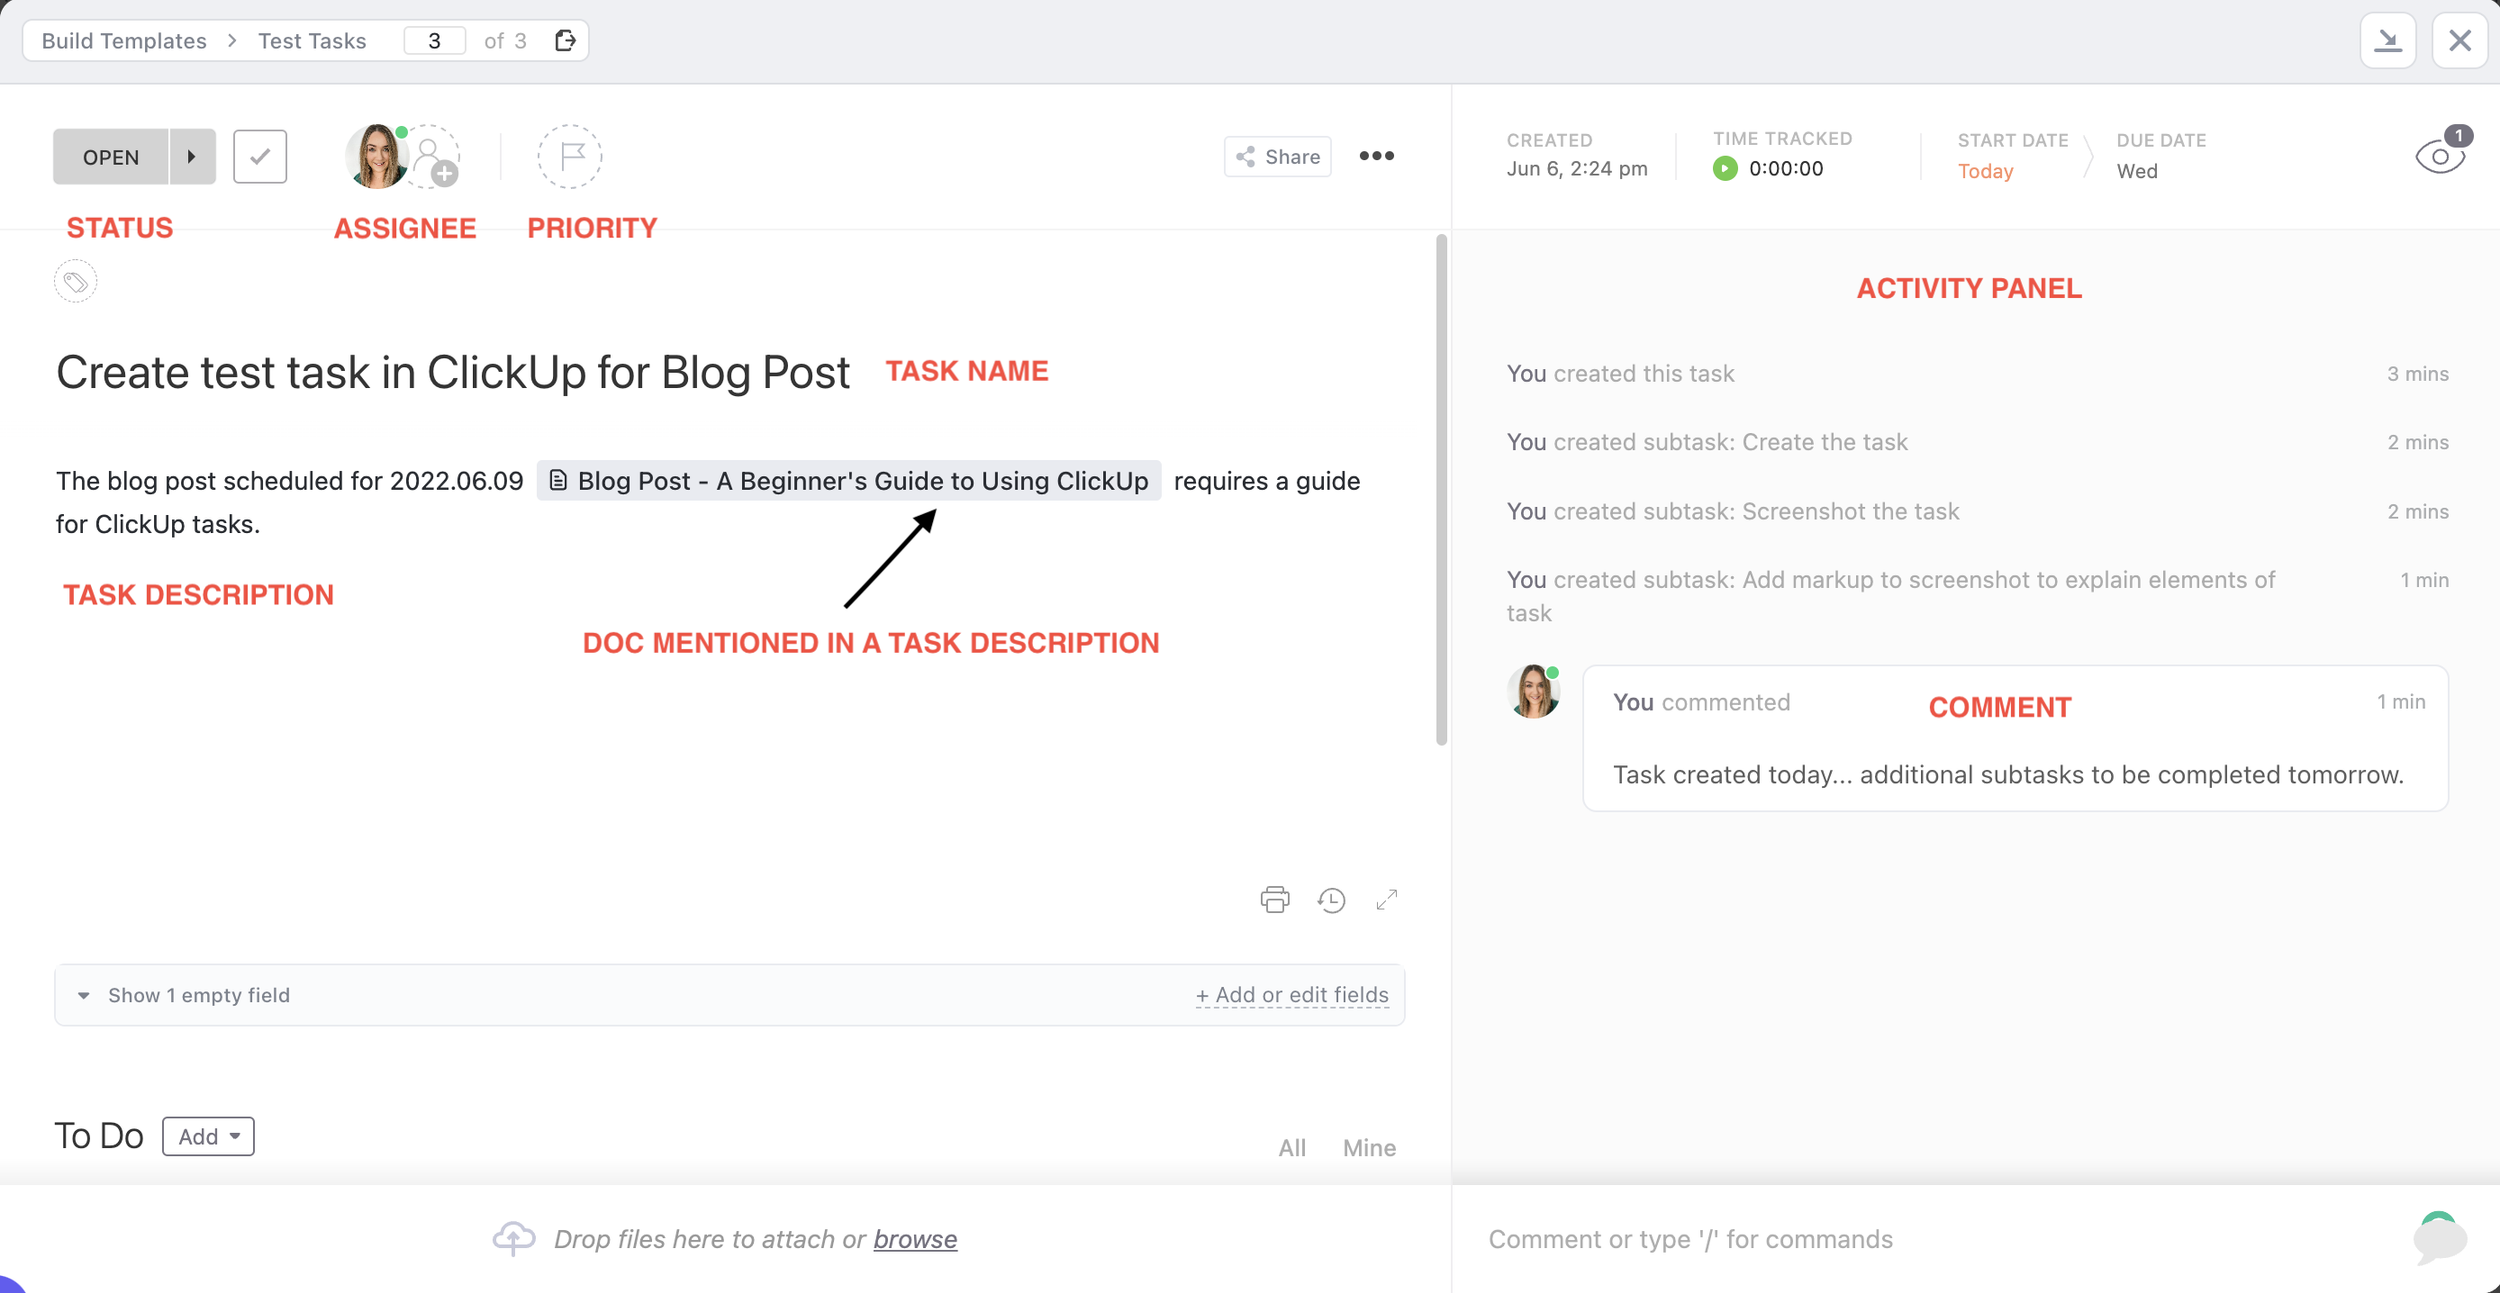
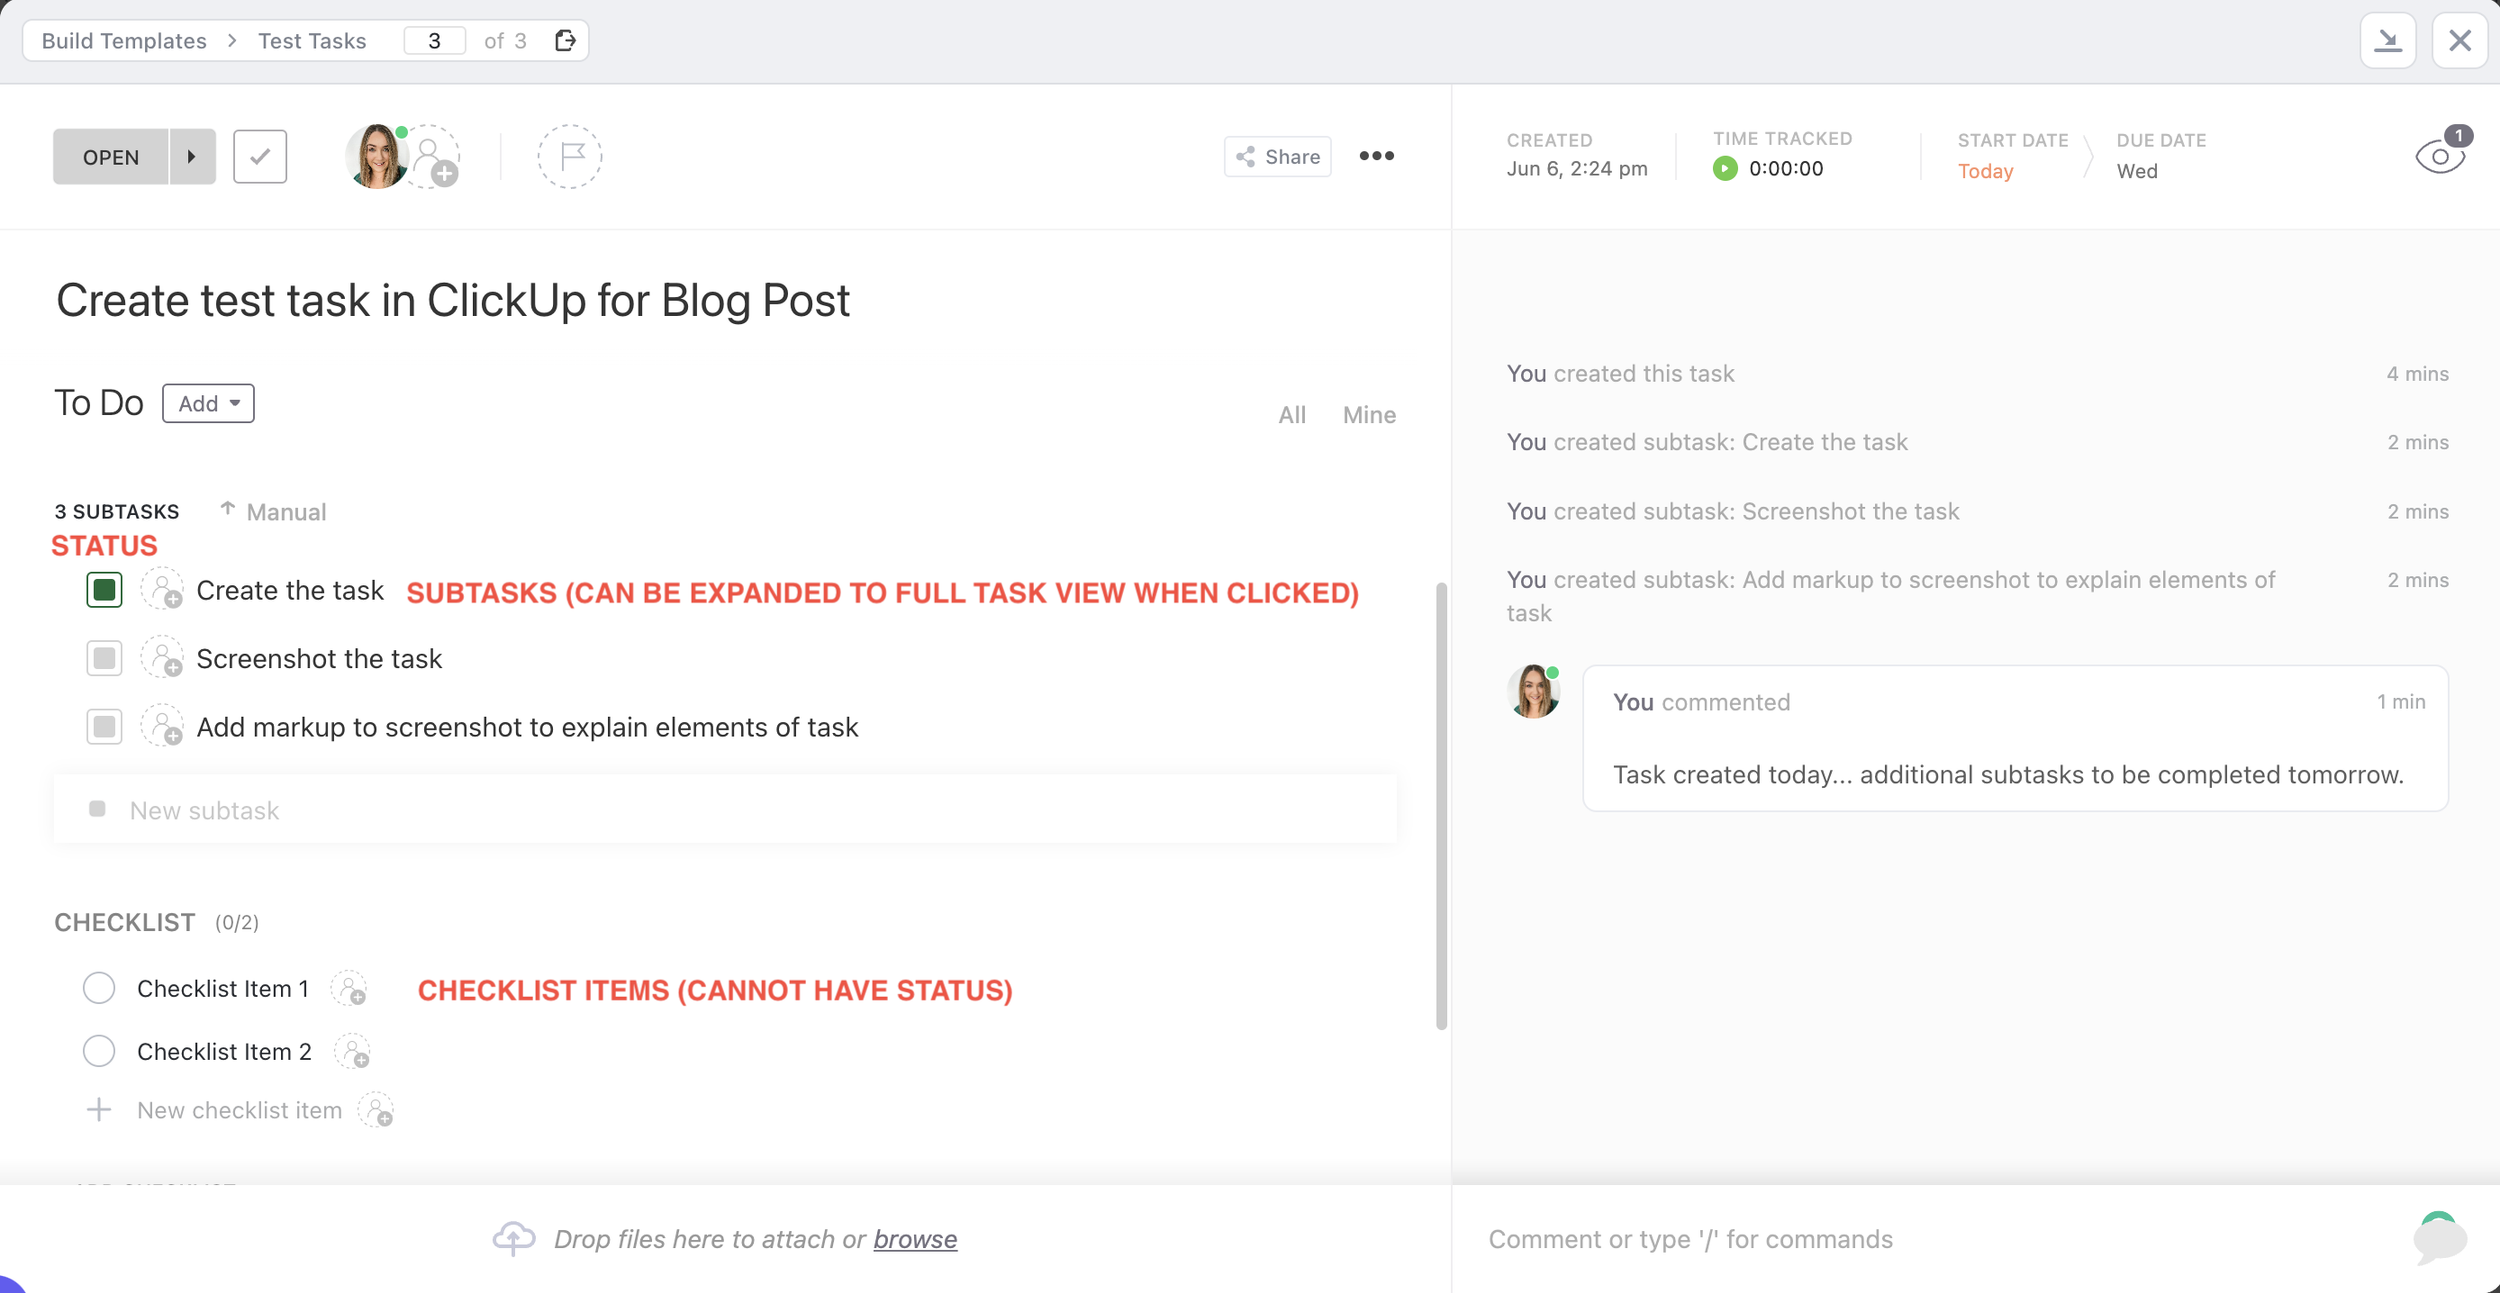
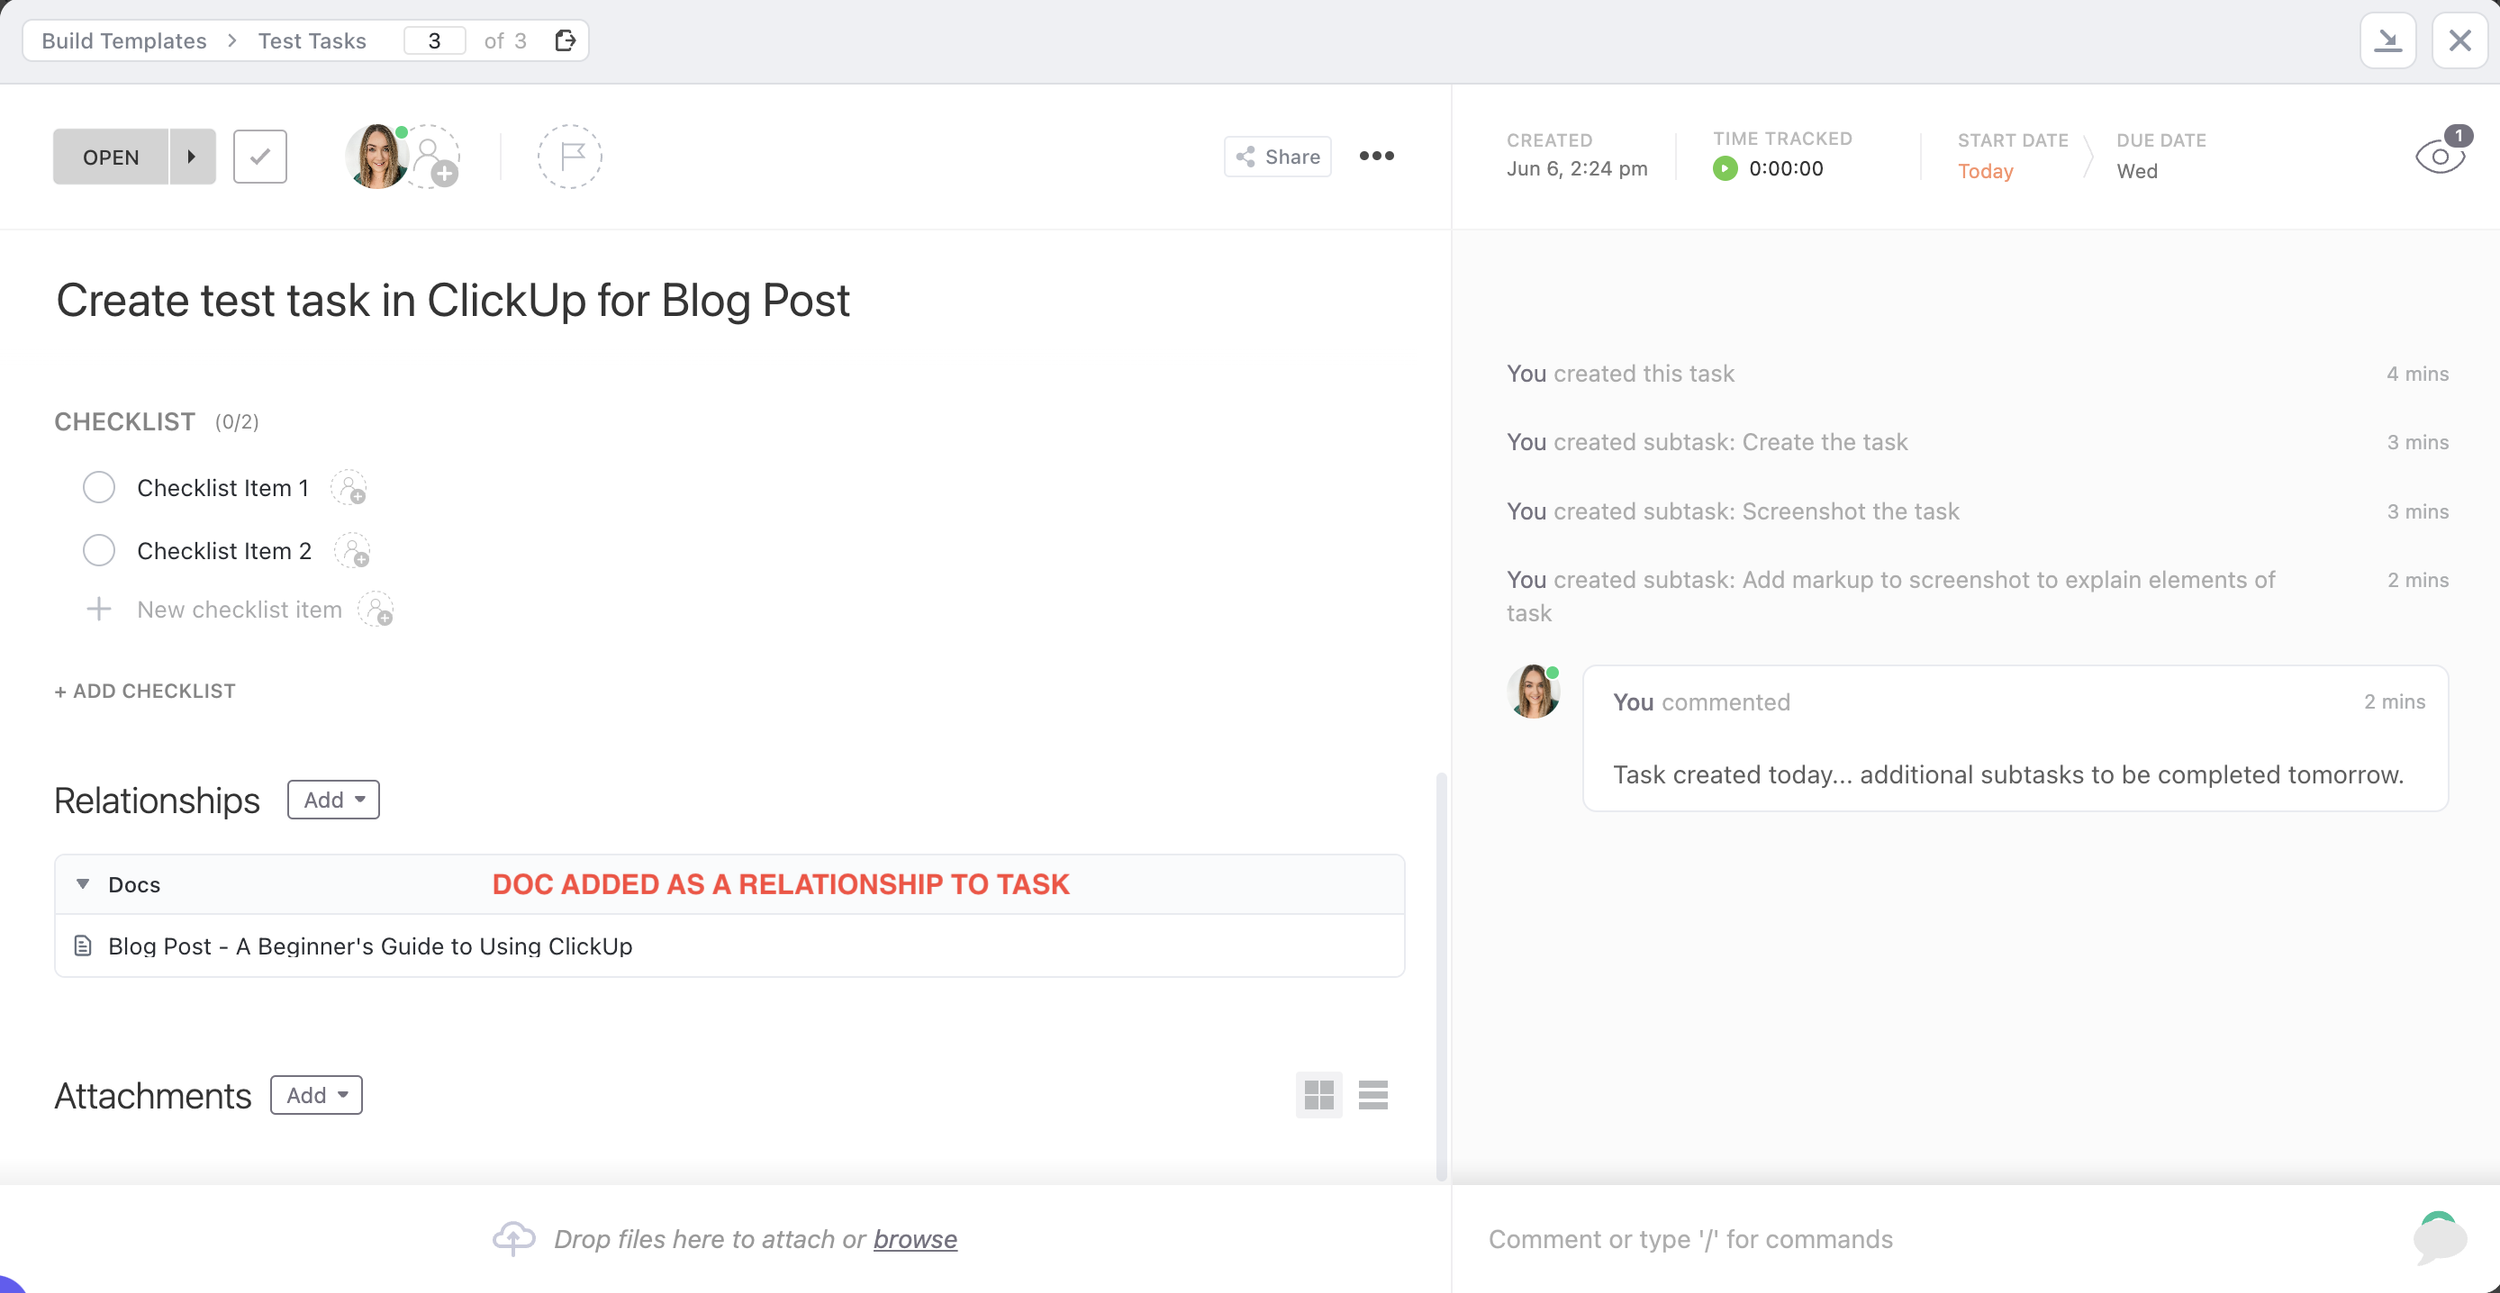
The Anatomy of a ClickUp Task
Because ClickUp is a project management software (among other things), Tasks are the key component for using the platform successfully and efficiently. With loads of features built-in, you can make your Tasks incredibly comprehensive while still being organized! Below, I’ve shared a few snapshots and quick descriptions of some of the key elements of a ClickUp Task.
The Bells and Whistles
While this is intended to be a beginner’s guide to ClickUp, I had to perform my due diligence and give you a quick insight into the additional (more advanced) ClickUp features. Getting familiar with these features will be a major asset when it comes to building a ClickUp Workspace that actually works for you and your team.
Here are some of my favourites:
-
ClickApps – Customize your Workspace by turning ClickApps on (or off). Examples include nested subtasks, custom fields, custom task IDs, Milestones, Relationships and more.
-
Templates – Create templates for Tasks, Docs, Lists and more to tackle redundancy and streamline your processes.
-
Relationships – Use Relationships to create relational databases, attach Docs to tasks or create dependencies to ensure proper order of operations.
-
Dashboards – Create custom comprehensive real-time reports, design client portals or implement training hubs using Dashboards (and the many available widgets)
-
Custom Fields – Add custom categories, URLs, Ratings, formulas, progress bars, relationships and more to your ClickUp Tasks to easily manipulate your data to see what really matters to you.
The truth is, creating a ClickUp Workspace that actually works for your business without the overwhelm and headache definitely takes some time and expertise but this guide for beginners is a great place to start.
Looking to make some serious strides in building your ultimate business management system in ClickUp? Learn more about my Operation Intensive Sessions and we can get right to work, STAT.

Thanks so much for this Sam, I have to say I feel overwhelmed with all that can be done in ClickUp and honestly paralyzed about how to start. It would be oh so wise for me to start using it now at the beginning of this business expansion stage, but I want to do it so that it will be effective and not waste time (because I don’t understand the program) only to find out I did it wrong anyway or give up part way through in abject frustration.
Do you offer any help in setting up ClickUp for "old folks like me, on a steep learning curve in toooooooo many areas already"?
Elizabeth Lacey
elizabeth@oakridgecounselling.com
also available on Voxer
Hey there Elizabeth! Thank you so much for reading and sharing your experience with diving into ClickUp! This is absolutely something I can help with. I’ll email you directly to let you know the options!
Talk soon!
S